Move

Wearable Breast Pump

Instructions for use

Thank you for your interest in the MAM Move Wearable Breast Pump. This innovative breast pump aims to provide maximum flexibility in everyday use, allowing more time for you and your baby. MAM Move can be worn in-bra without any tubes or wires and is exclusively intended for expressing milk from the breast of lactating women. Please note that MAM Move is a product for personal use. This breast pump is intended for individual users.


Please read all instructions carefully before using the MAM Move Wearable Breast Pump for the first time.

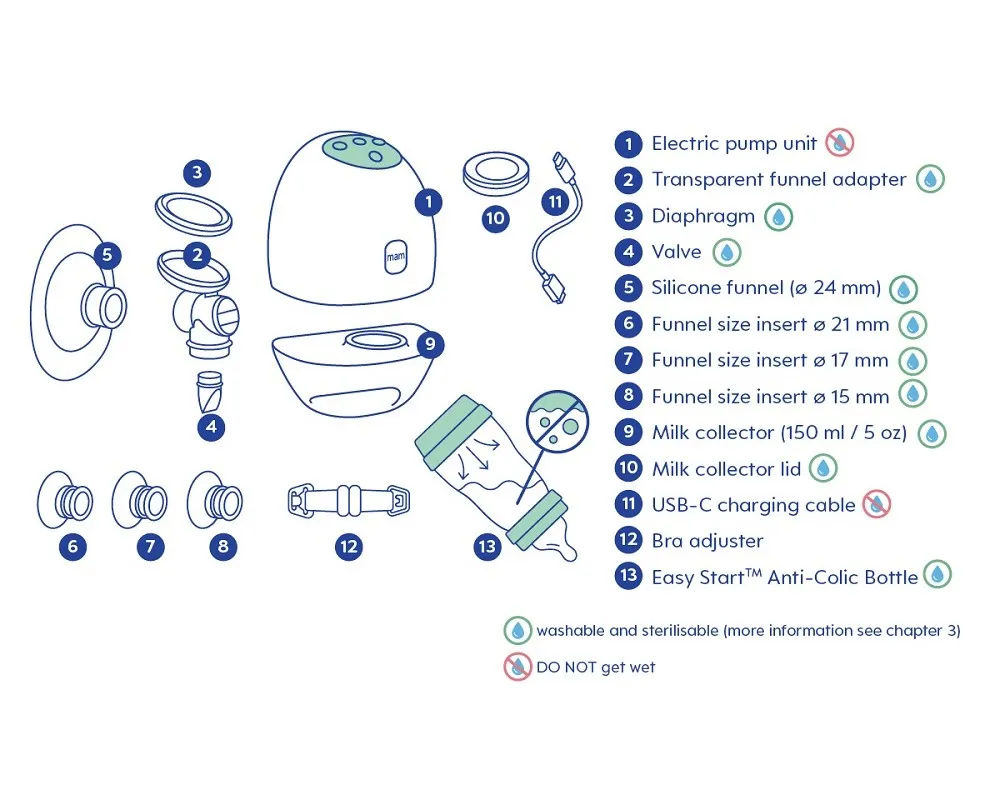
1. Product Description

2.1. These instructions are important for safety

The MAM Move Wearable Breast Pump contains a motor, an electric rechargeable battery and parts that must be kept clean. Damage or improper handling of the breast pump can cause infections, injuries and fire. The instructions for use are part of the breast pump and contain full information on how to avoid these risks.

  • Read and observe the instructions for use in their entirety.
  • Keep the instructions for use within easy reach.
  • Always use the breast pump in accordance with its intended use.

2.2. Intended use

The MAM Move Wearable Breast Pump is exclusively intended for expressing milk from the breast of lactating women. MAM Move is a single-user product, use by more than one person may present a health risk. This breast pump is exclusively intended for personal use.

  • DO NOT USE the pump while driving a vehicle.
  • When transporting and/or using the pump in an aircraft: Check regulations regarding the transport of devices with lithium-ion batteries in advance. Also, make sure to be aware of the airline regulations for the use of portable electronic devices.

2.3. Keep the MAM Move Wearable Breast Pump out of reach of children

Children cannot assess the risks and could injure themselves. Parts of the packaging and small components can be swallowed.

  • Keep all parts of the breast pump and packaging out of the reach of children.
  • Remove and safely dispose of all packaging from the breast pump. Children can swallow parts.
  • NEVER allow children to play with the breast pump.
  • Clean the breast pump yourself. DO NOT let children clean or maintain the breast pump.
  • Secure the charging cable and make sure that it cannot be pulled inadvertently, causing the appliance to fall onto the floor.

2.4. People with limited faculties

People with limited physical, sensory, and mental abilities as well as people with minimal experience or knowledge cannot assess the risks.

  • Such people must always be supervised.
  • Show such people how to use the device safely.

2.5. Before and after use
  • Check the breast pump before each use for damage. Only use it if the appliance and charging cable are intact.
  • If the breast pump is damaged, STOP using the breast pump.
  • At the first sign of any damage, the component in question must be either disposed of or repaired.
  • When charging with the USB-C charging cable, make sure that the breast pump does not fall over.

2.6. Damage to device from water
  • DO NOT use the breast pump in the bathtub or shower.
  • DO NOT immerse the electric pump unit in water. The MAM breast pump could otherwise cause a fire and would have to be discarded.
  • DO NOT clean the electric pump unit in the dishwasher.
  • If the electric pump unit accidentally falls into water, do not reach for it. Unplug immediately.

2.7. Cleaning and sterilising

Before each use, clean and, if necessary, sterilise all parts that come into contact with the breast and breast milk as explained in section 3 (Cleaning the appliance and set components).

  • When cleaning the pump unit, unplug the adapter.

2.8. Storing the device
  • Do not store wet or damp parts, as mold may develop.
  • It is recommended to store the breast pump at room temperature (21 °C – 25 °C).
  • Avoid excessive temperature changes.
  • Keep the breast pump out of direct sunlight.
  • Keep the breast pump away from heat sources.
  • Never place the device’s electric pumping unit in the microwave.
  • Never place the device’s electric pumping unit in the fridge or freezer.

2.9. Use the correct accessories
  • Use of accessories and cables other than those specified or provided by the manufacturer of this equipment could result in improper operation.
  • It is recommended to use a certified 5V 2A USB power adapter compatible with your regional power sources to charge the device.

2.10. Repairing the MAM breast pump, replacing the rechargeable battery
  • A damaged MAM breast pump is a safety hazard.
  • Warning: NEVER open the electric pump unit of the MAM breast pump.
  • The appliance may only be opened by an authorized service center. Opening by any unauthorized person will automatically make the warranty invalid. Repairs may only be performed by specialist personnel. Improper repairs can create serious safety hazards for users.
  • If the MAM breast pump is damaged or is not working, please call the MAM hotline.

2.11. Handling, charging and disposal of the lithium-ion battery
  • Charge the battery at least once a month. To maximize the working life of the device, charging time should not exceed 6 hours.
  • DO NOT remove the battery yourself. Inbuilt lithium battery is non-removable. As the battery needs to be collected, please ask for help to remove the battery from the appliance at the recycling location.

2.12. Safely disposing of the MAM breast pump

In order to protect the environment, you are legally required to dispose of the device safely.

The symbol for this device means:

  • Dispose of the electrical equipment at a disposal point.
  • DO NOT dispose of with unsorted municipal waste. .
  • Sellers must take back the electrical equipment free of charge. .

2.13. Important information for your health
  • It’s recommended to consult with a licensed healthcare professional before using the MAM Move Wearable Breast Pump if you have an active implanted device that would be affected by a magnetic field (e.g. pacemaker, implantable cardioverter defibrillator).
  • Using a breast pump should not cause pain. Do not try to express with an intensity setting that is too high or uncomfortable. If excessive discomfort or pain is felt during pumping, stop pumping, release the funnel placed on your nipple and discontinue the session.
  • Contact your healthcare professional if you express minimal or no milk, or if expression is painful.

Before using your MAM Move Wearable Breast Pump for the first time and after each use, all parts that come into contact with the breast and breast milk must be separated, cleaned and sterilised. The electric pump motor unit must NOT be washed with water.

  • Only drinking-quality water must be used for cleaning.
  • Completely air dry before reassembly and next use. Partially wet components may affect the operation of the breast pump.
  • Take care not to damage parts of the pump set during cleaning.

3.1. Washable components

Cleaning washable components that come into contact with milk prevents the build-up of dry milk residue, which can cause the growth of bacteria that may be harmful to you and your baby. All washable and sterilisable parts are marked in the product description (see chapter 1).


3.2. Cleaning by hand

Before cleaning, all parts of the pump must be separated. Begin by rinsing all washable components in cold, clear water. Then wash all parts in warm soapy water, with a damp cloth or sponge and rinse thoroughly with cold water afterwards. Do not use any abrasive cleaning agents such as anti-bacterial solutions, as these could attack the appliance’s surface. Leave the separated parts to air dry.

3.3. Cleaning in the dishwasher

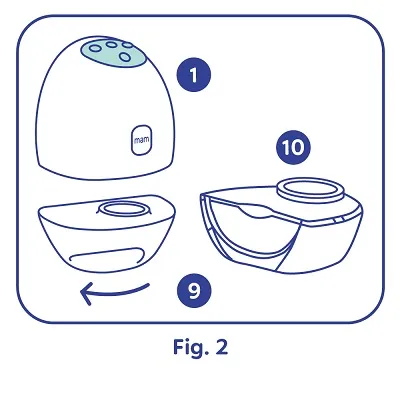
To clean the breast pump components in the dishwasher, place the separated washable parts on the top rack of the dishwasher or in the cutlery section. When washing the pump parts in the dishwasher, the components may become discolored by food pigments – this does not affect their function. We recommend to carefully clean the diaphragm (3), valve (4), and bottle lid (10) by hand to prevent damages and to ensure that those small components do not get lost.


3.4. Cleaning the electric pump unit

Do NOT wash or sterilise the electric pump motor unit, this component does not come into contact with your breast milk. The pump motor contains electronics that should be kept dry. To clean the electric pump unit, unplug the appliance, switch it off and wipe it with a clean, damp cloth. Never place it in a dishwasher for cleaning. The appliance must not be immersed in water.


3.5. Sterilising

Before using the pump for the first time and after each use, it is recommended, to sterilise all components that come into contact with breast milk. The parts marked as sterilisable are suitable for the following sterilisation methods: The separated pump parts can be sterilised in boiling water (maximum 5 minutes), in an electric or microwave steam steriliser (maximum 11 minutes) as well as in cold sterilising liquid. Do not leave any part standing in sterilising solutions longer than recommended. This could negatively affect the product function and may weaken the parts.

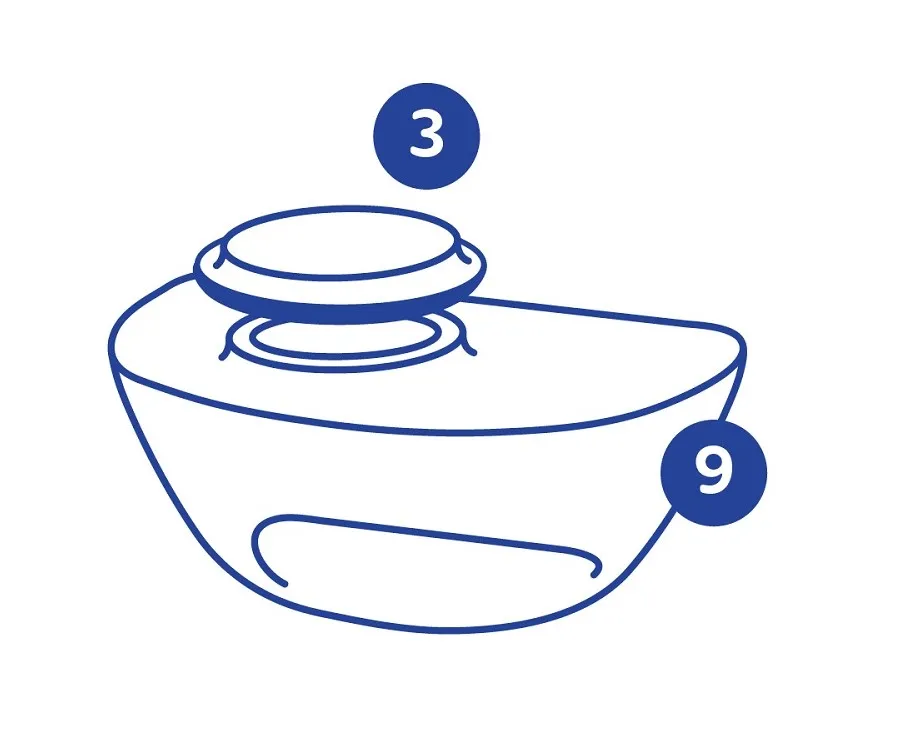
The self-sterilising function of the milk collector is proven to be effective for killing common household germs and bacteria. This practical and time-saving function can be achieved in a few simple steps:

  1. Please ensure the milk collector (9), diaphragm (3) and microwave (including the waveguide cover and turntable) are COMPLETELY CLEAN and free from dirt, food residue, fat or oil splashes. If not, this could lead to the milk collector melting and the microwave sparking or the waveguide cover burning!
  2. Fill the cleaned milk collector with 20 ml of cool water.
  3. Place the diaphragm (3) on top of the milk collector (9) and ensure the largest area of the diaphragm is placed over the opening and facing upwards. Make sure the diaphragm completely covers the milk collector opening.
  4. Place the milk collector in the microwave. Follow the user manual of your microwave. Do not put the milk collector at the center of the turntable.
  5. Set microwave to 900W for 3 minutes. Do not leave your microwave unattended during the sterilising process! Stop the microwaving-process immediately if whole water is vaporised.
  6. After the 3 minutes have elapsed, allow to cool for at least 5 minutes.
  7. Open microwave. Carefully remove the milk collector from the microwave. CAUTION! The milk collector and water may still be very hot after the 5-minute cooling period!
  8. After the 5-minute cooling period, pour out remaining water.
  9. For hygienic storage, close the milk collector with the sterilised lid (10) until next use.

After cleaning and sterilising, store the pump set in a clean bag / container until next use.
Please note: never sterilise the assembled pump – always separate the parts.
Important: allow all parts of the pump to fully cool and dry before use.

  • This product has a built-in lithium-ion battery. Fully charge the device before first use.
  • When the battery is low in working process, the left side indicator light will flash. Charge immediately if low battery is indicated. .
  • To charge the pump use the USB-C charging cable provided to connect the electric pump unit to a certified USB power adapter (5V, 2A), such as your phone plug. .
  • When fully charged, the five battery indicators all light up. It takes approximately 90 minutes to fully charge the battery, which provides approximately 2 hours usage time on standard settings. .
  • The pump can be used whilst charging.
  • TIP: The remaining battery power can be checked by pressing the + and - buttons simultaneously for 2 seconds and counting how many indicators light up (the pump has to be switched off). Each indicator represents about 20% remaining power.
For hygienic purposes, please wash your hands thoroughly before assembling the breast pump.
  1. Make sure all parts are dry before putting them together (after the washable parts have been cleaned and sterilised).
  2. Attach the diaphragm (3) to the transparent funnel adapter (2).
  3. Attach the valve (4) to the transparent funnel adapter (2).
  4. Push the well assembled transparent funnel adapter (2) into the electric pump unit (1) until you hear it click. Make sure its assembled in place.
  5. Attach the milk collector (9) to the transparent funnel adapter (2) by screwing the milk collector anti-clockwise. The end position is indicated by markings on both the milk collector (9) and the transparent funnel adapter (2).
  6. Push the silicone funnel (5) into the transparent funnel adapter (2). For correct alignment, pay attention to the three markings on the edge of the silicone funnel (5), which should align with those on the electric pump unit.
  7. MAM Move offers four funnel sizes for maximum comfort and efficiency: In the case that the standard silicone funnel in ∅ 24 mm (5) is too big for you, you may choose one of the three size inserts ∅ 21 mm (6), ∅ 17 mm (7) or ∅ 15 mm (8), to be placed in the center of the ∅ 24 mm funnel. The size of each insert is engraved on its side. To find the right size for you, try measuring the diameter of your nipple at the end of a breastfeeding or pumping session. For a comfortable fit, choose the funnel that is slightly larger in diameter than your nipple.
Tips for getting the best fit:
  • The best size will fit around your nipple (no areola) closely.
  • If you have elastic (stretchy) nipples a snug fit is very important.
  • If you have flat nipples, sometimes looser sizing can be more comfortable.
  • If you have been using the wrong funnel size and have swollen or damaged nipples, you may need to let your nipples settle to visualize size accurately.
  • Funnel fit is very unique as every nipple behaves differently during pumping. Plan to try different sizes along your pumping journey to find the best fit
  • Wash your hands with soap and your breasts and nipples using a warm wash cloth and clean fresh water.
  • Squeeze a little bit of milk out of each nipple to make sure the milk ducts are not clogged.
  • Ensure that all parts of the pump are clean and disinfected before use.
  • Before using, make sure that the pump is properly assembled and fully screwed onto the milk collector.
  • Ensure that the battery is fully charged before first use.
6.1. Aligning your nipple
  • Once you found the right funnel size for you, place the funnel (with or without size insert) firmly on your breast.
  • Correct nipple alignment in the funnel is key to comfort, expression, and performance. Your nipple must be positioned correctly in the funnel before pumping to avoid discomfort.
  • Support the breast with your hand from below and press the nfunnel onto your breast.
  • Getting the right compression could impact milk volumes. The pump needs to be firmly pressed against your breast. There should be no gaps between pump and breast. Make sure that no air enters through the side, otherwise no suction will develop.
  • Position the breast pump in your standard nursing bra
6.2 Finding the right compression
  • Every bra has a different level of support, so make sure to get the compression right before each session. If you are using a particularly structured and inflexible bra, the included Bra Adjuster (12) may be used to create more room.
  • Once the buckle of each end is attached to the nursing bra, adjust the length of the Bra Adjuster so that the pump fits securely and comfortably in your bra.

7.1. Controls
7.2. Starting your session
MAM Move Wearable Breast Pump shall be used in an upright position.
  1. Once the pump fits securely and comfortably in your bra, turn the device on by pressing the power button for 2 seconds.
  2. Short press the power button to Pause / Play if you need to pause pumping for any reason. When the pause time exceeds 5 minutes, the pump will automatically shut down and enter the standby mode.

7.3. Modes
MAM Move Wearable Breast Pump offers 3 different pumping modes:
  1. Stimulation mode , produces a short, quick pumping rhythm which perfectly mimics baby‘s natural sucking behavior and stimulates the milk flow,
  2. Expression mode , for efficient milk expression and
  3. Silent mode , for extra discreet and peaceful pumping.

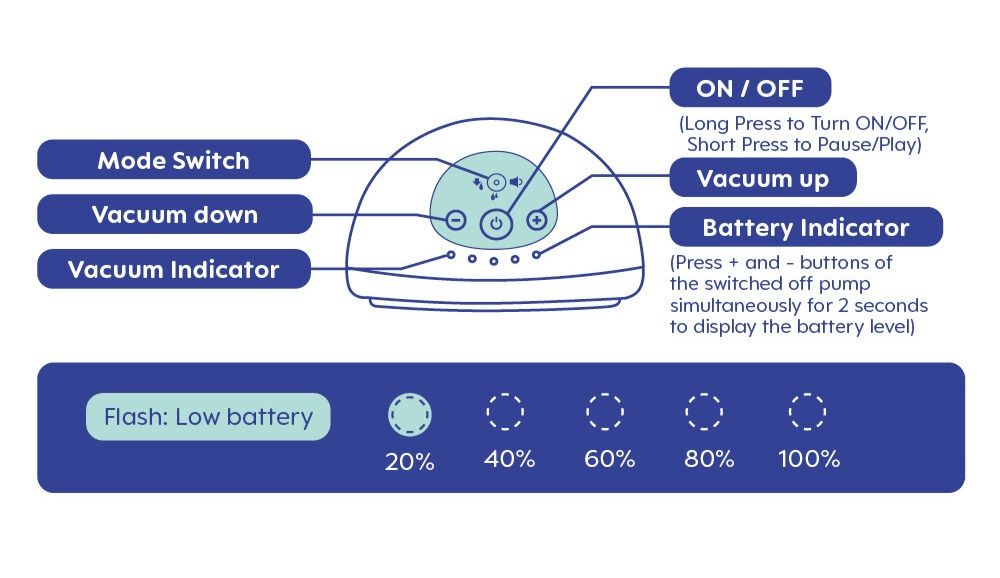
To switch between the 3 modes press the Mode button: The selected mode is indicated by the corresponding icon lighting up. The breast pump starts the pumping process in Stimulation mode before automatically switching to Expression mode after 2 minutes. If your milk starts to flow earlier, you can also switch to Expression mode (or Silent mode) manually by pressing the Mode button.


7.4. Intensity Settings
  • MAM Move Wearable Breast Pump offers 5 different levels of suction strength, giving control over what feels comfortable and works most efficiently in every mode.
  • Once you can feel the suction on your nipple, press + / - to adjust intensity to find your preferred setting in every of the three modes. The 5 indicator lights represent 5 levels.
  • When used for the first time, the pump enters in level 1 (default setting) with the leftmost indicator lighting up. During following pumping cycles, the pump automatically starts at the most recently selected level.

Please note: A higher intensity setting does not always mean a higher volume of milk. Putting your nipple under excess stress can reduce milk production. Always ensure you are pumping at a comfortable level. If you don’t feel suction, please check the pump is assembled correctly.


7.5. Ending your session
  • Long press the Power button to stop pumping and switch off. (The pump will automatically switch off after working 30 min).
  • Unclip your bra and use your finger to release the funnel placed on your nipple, this will remove the vacuum easily without nipple damage.
  • Remove the pump from your bra.
8.1. Storage
  • After finishing your pumping session, twist the Milk Collector (9) to remove it from the electric pump unit (1), see Fig. 2.
  • You may store your expressed milk in the Milk Collector (9) using the Lid (10) provided or pour your expressed milk into the MAM Easy StartTM (13) bottle or another clean (sterilised) container of your choice for storage or feeding.
  • Breast milk can be stored in the fridge at 4°C (39°F) for up to 72 hours.
  • Do not store breast milk in the door of the refrigerator. Instead, choose the coldest part of your refrigerator (this is at the back of the glass shelf above the vegetable compartment).
  • Please note: Neither the milk collector nor the Easy Start bottle is suitable for storing expressed milk in the freezer or freezer compartment.
  • To store milk in the freezer, use a suitable container such as the MAM Storage Solution. It is recommended that breast milk is frozen in small portions of 40-120 ml/ 1.5-4 UK floz. Breast milk can be kept in the freezer at -18°C (0°F) for 3 months.
  • Use milk that has been stored the longest first.
  • When transporting breast milk, it is important that the cooling chain is not interrupted.

8.2. Milk warming
  • Defrost frozen breast milk in the fridge overnight, carefully in a water bath or with a bottle warmer that offers a defrost setting, such as the MAM Electric Steriliser & Express Bottle Warmer.
  • For immediate use defrost at room temperature.
  • Do not defrost breast milk in the microwave, as this will reduce its nutritional value.
  • To warm the milk, place in a bath of hot water or a bottle warmer. To warm to body temperature, running water can also be used. Start with cold running water and gradually increase the temperature until the milk is warm.
  • Remove the screw ring of the Easy Start before placing the bottle in the water bath or bottle warmer for warming. Be sure to remove teat and lid before heating.
  • Breast milk should never be refrozen. Pour warmed unused milk away.
  • Never mix newly expressed breast milk with frozen milk.
  • Always check the temperature of the milk before feeding.
  • Once your baby has drunk from a bottle of breast milk, it should be used within the hour and anything left over should be thrown away.

8.3. Feeding

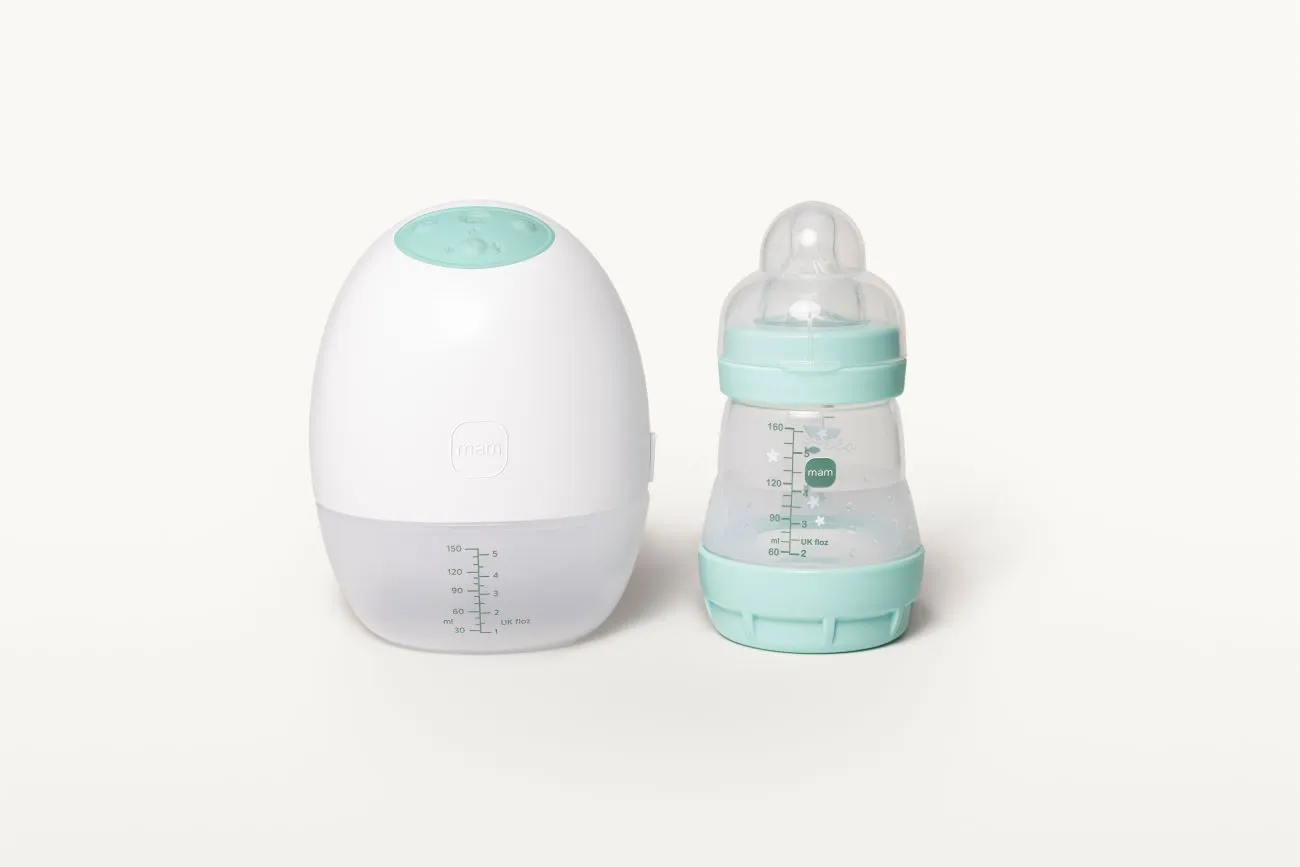
MAM recommends the included MAM Easy Start™ Anti-Colic Bottle for feeding breast milk. For more information, please read the separate instructions for the Easy Start™ Bottle.

PROBLEM 1
Weak Suction or No Suction.

Cause Solution
Check whether the diaphragm (3) is installed reversely or damaged. Reinstall or replace the diaphragm.
Check whether the connection between diaphragm (3) and pump motor (1) is tight. Reassemble to tighten all connections.
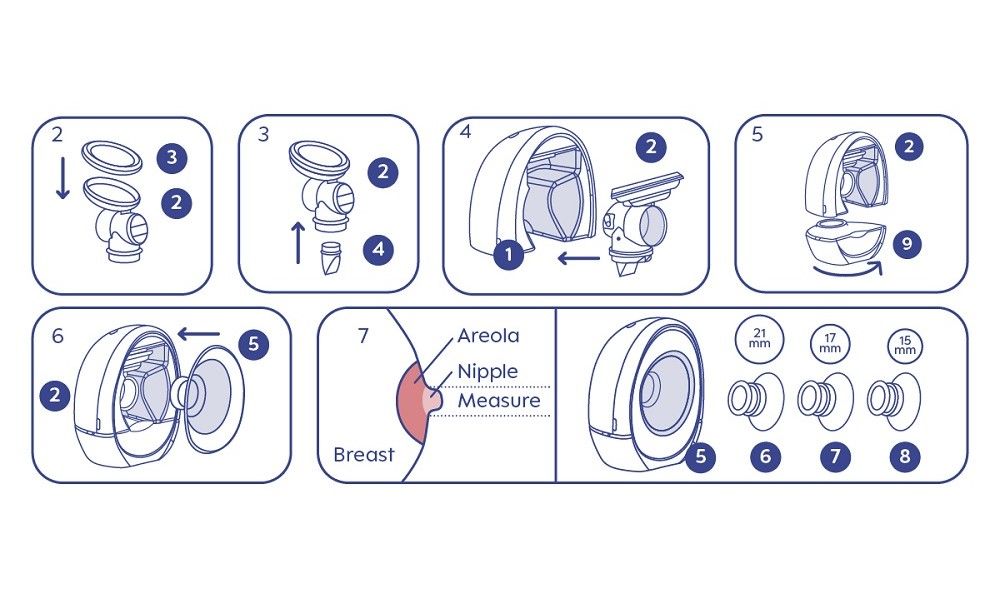
Check whether the silicone funnel (5) fits the breast completely. Always make sure the funnel fits the breast with the nipple placed in the center of the funnel.
Check whether the valve (4) is missing. Always make sure that the valve (4) is assembled to the Transparent Funnel Adapter (2).


PROBLEM 2
Cannot turn on or charge.

Cause Solution
Check whether the output of charger meets the requirements and whether the charger is plugged in properly. Use the right charger and make sure it is properly plugged in.
The lithium battery is empty. Charge the pump when the battery is low or empty. For more information see chapter 2.11. and chapter 4.


This product contains rechargeable batteries. In the interests of protecting the environment, please do not dispose of the product in household waste at the end of its useful life. Disposal should take place at an approved recycling location. A lithium-ion battery is built in: DO NOT remove the battery yourself. As the battery needs to be collected, please ask for help to remove the battery from the appliance at the recycling location.

This appliance is covered by a statutory 2-year warranty period from the date of purchase upon presentation of proof of purchase. This does not include damage that is attributable to natural wear and tear, improper use and insufficient or incorrect maintenance. If handled carefully and in accordance with the instruction manual, the manufacturer provides a 2-year warranty from the date of purchase. The charging cable is excluded from the warranty in cases of normal wear and tear. When returning the appliance under warranty, always be sure to enclose proof of purchase. .

If the appliance ever needs repairing, under no circumstances attempt to open it. The appliance cannot be opened. In the event of a malfunction, please send the appliance directly to the MAM Customer Service department.
Important: Improper repairs can make the appliance extremely dangerous to use. .

Power (Output) of charger to be used: 5V 2A
Battery type and capacity: Lithium-ion Polymer Battery Specification: 3.7V 1300mAh
Stimulation Mode suction: -60 mbar - -160 mbar, 5 levels adjustable
Expression Mode suction: -160 mbar - -340 mbar, 5 levels adjustable
Silent Mode suction: -80 mbar - -250 mbar, 5 levels adjustable
Timer: 30 min
Noise: < 50 dB
Operation conditions: +5°C to +40°C, humidity 10%-90%RH
IP rating: IP22